Reviews Home 3d Printer Under 500

Greensen Printer Stand with Storage, Metal Printer Cart, Easy-Install Printer Stand for Desk, Heavy Duty Printer Table, Printer Shelf with Deep Storage Basket, Printer Desk, Printer Stand Under Desk
- 【Easy and Efficient Installation】 Following the video instructions, you'll have this printer table for home office assembled in minutes..
- 【On/Under Desk Storage】 By installing or removing tires, Greensen 3d printer table can be used as On/Under Desk Storage..
- 【Reliable Metal Material】With classic metal manufacturing craft, which is definitely more durable, sturdy, stable, safer than the plastic one, Greensen under desk printer stand can support your printer more durable, preventing the printer from falling down..
- 【Thick and Strong Structure】 Come with 2.2" top shelf, including the 0.7" thick wood tray and 1.5" triangular metal structure, and 3" bottom storage layer, Greensen printer table with storage can hold up to 100lb..
- 【Flexible Storage Solution】 Rolling by 4 wheels, which is flexible and lockable (2 lockings), the Greensen printer stand under desk could be slid in and out smoothly when under the table. The suitable size (16.14"×12.21"×15.35") makes it move freely without blocking the way. It also can be used as a coffee cart, garage tool cart, snack cart, game equipment cart, projector trolley, etc..
Check Stock
OctoPrint 3D Printer Remote Control Webserver System Pre-Flash Card and Inland 1.75mm Black ABS 3D Printer Filament Bundle
- A 3D Printer accessories combo - 1.75mm Black ABS 3D Printer Filament bundle with OctoPrint 3D Printer System Pre-flashed 32GB Micro SD Card.
- ABS Filament Specs: Black - 1 KG / 2.20 lbs per spool - 1.75mm diameter (+/- 0.03mm). Recommended Print Temperature: 240°C - 260°C (464°F - 500°F)/ Print Bed Temperature: 80°C - 110°C (176°F - 230°F).
- Why INLAND ABS Filament: Designed with the high quality and compatibility in mind, Inland ABS Filament undergoes numerous testing procedures to help you spend less time troubleshooting and more time printing. Your filament will arrive dried and vacuum sealed with desiccant to ensure a high-quality smooth print.
- OctoPrint is a snappy webserver that runs on a Raspberry Pi and lets you remote-control a 3D printer from your computer. Control and monitor your 3D printer from your phone or other web-capable device. Easily stop, start, or pause your 3D prints from anywhere.
- Compatible with most of the available consumer 3D printers and its powerful plugin system allows extending its functionality in various ways. Setup hardware: Any Raspberry Pi (Pi 3 and up for the best experience), USB power supply, USB cables, webcam feed(optional).
Check Stock
OctoPrint 3D Printer Remote Control Webserver System Pre-Flash Card and Inland 1.75mm White ABS 3D Printer Filament Bundle
- A 3D Printer accessories combo - 1.75mm White ABS 3D Printer Filament bundle with OctoPrint 3D Printer System Pre-flashed 32GB Micro SD Card.
- ABS Filament Specs: White - 1 KG / 2.20 lbs per spool - 1.75mm diameter (+/- 0.03mm). Recommended Print Temperature: 240°C - 260°C (464°F - 500°F)/ Print Bed Temperature: 80°C - 110°C (176°F - 230°F).
- Why INLAND ABS Filament: Designed with the high quality and compatibility in mind, Inland ABS Filament undergoes numerous testing procedures to help you spend less time troubleshooting and more time printing. Your filament will arrive dried and vacuum sealed with desiccant to ensure a high-quality smooth print.
- OctoPrint is a snappy webserver that runs on a Raspberry Pi and lets you remote-control a 3D printer from your computer. Control and monitor your 3D printer from your phone or other web-capable device. Easily stop, start, or pause your 3D prints from anywhere.
- Compatible with most of the available consumer 3D printers and its powerful plugin system allows extending its functionality in various ways. Setup hardware: Any Raspberry Pi (Pi 3 and up for the best experience), USB power supply, USB cables, webcam feed(optional).
Check Stock
OctoPrint 3D Printer Remote Control Webserver System Pre-Flash Card and Inland 1.75mm Blue ABS 3D Printer Filament Bundle
- A 3D Printer accessories combo - 1.75mm Blue ABS 3D Printer Filament bundle with OctoPrint 3D Printer System Pre-flashed 32GB Micro SD Card.
- ABS Filament Specs: Blue - 1 KG / 2.20 lbs per spool - 1.75mm diameter (+/- 0.03mm). Recommended Print Temperature: 240°C - 260°C (464°F - 500°F)/ Print Bed Temperature: 80°C - 110°C (176°F - 230°F).
- Why INLAND ABS Filament: Designed with the high quality and compatibility in mind, Inland ABS Filament undergoes numerous testing procedures to help you spend less time troubleshooting and more time printing. Your filament will arrive dried and vacuum sealed with desiccant to ensure a high-quality smooth print.
- OctoPrint is a snappy webserver that runs on a Raspberry Pi and lets you remote-control a 3D printer from your computer. Control and monitor your 3D printer from your phone or other web-capable device. Easily stop, start, or pause your 3D prints from anywhere.
- Compatible with most of the available consumer 3D printers and its powerful plugin system allows extending its functionality in various ways. Setup hardware: Any Raspberry Pi (Pi 3 and up for the best experience), USB power supply, USB cables, webcam feed(optional).
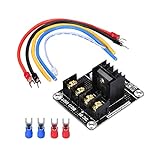
Check StockBIQU Heat Bed Power Module Expansion Hot Bed MOS Tube for 3D Printer
- A general add-on heated bed power expansion module for 3D printer.
- Completely solve the hot bed power is too large and the load current issue. It can work with the Anet A8.
- With this addon module to your 3D printer motherboard you can lead the maximum current up to 15A.
- Under the premise of normal heat dissipation, this module can work steadily under the condition of I(Max)=15A. Don't exceed 15A during the process.).
- If you intend to use heated bed with your 3D printer that uses a 12V power supply, then this module is recommended, else it may cause excessive....
Check Stock3pcs DEVMO 3D Printer Limit Switch Mechanical Switch Module Endstops Switch with 39.4 inch Cable Compatible with Ramps RepRap Tevo Tornado
- Compatible with Ramps Tevo 3D Printer Parts, Optical Endstop switch with 1M Photoelectric Light Control.
- Endstops for 3D Printer: usedd for Tevo, if you want to in all creality 3D Printer, CR -10 CR 10S S4 ,S5.
- Must 3D Printer Limits: With trigger indicator, 3 Pin N/O N/C control, easy to use Micro Switch.
- Warm Tips: Generally, the printer DIY system need at least three optical switches.
- Under normal circumstances, the system must be configured to at least three mechanical switches.
Check Stock
Tattoos
- ✪【Easy installation and simple operation】: For beginners, if you don't know how to use 3D slicing software, you can directly download the model file (Gcode file) to the TF card, insert it into the printer, and start printing. Press the "+" button to put the material in. If you need to replace or remove the material, press the "-" button and wait for a while to pull it out. After the material is put in, press the play button to start printing. The X1 3D printer is also suitable for children, but it needs to be done under the guidance of parents..
- ✪【Important steps】: Leveling is the most important part of using this printer. Press the home button to start leveling, when the nozzle touches the magnetic plate, disconnect the power and start leveling. If the printer is not leveled properly, the magnetic plate may be damaged by being squeezed by the nozzle. If the nozzle is too far from the magnetic plate, the printed model will not stick to the magnetic plate. Please watch the leveling manual or video carefully.
- ✪【HIGH PRECISION PRINT HEAD】: 3D printer's nozzle uses a professional all-metal nozzle to ensure the best printing tem....
Check Stock
The Cheap Detective
- ✪【Easy installation and simple operation】: For beginners, if you don't know how to use 3D slicing software, you can directly download the model file (Gcode file) to the TF card, insert it into the printer, and start printing. Press the "+" button to put the material in. If you need to replace or remove the material, press the "-" button and wait for a while to pull it out. After the material is put in, press the play button to start printing. The X1 3D printer is also suitable for children, but it needs to be done under the guidance of parents..
- ✪【Important steps】: Leveling is the most important part of using this printer. Press the home button to start leveling, when the nozzle touches the magnetic plate, disconnect the power and start leveling. If the printer is not leveled properly, the magnetic plate may be damaged by being squeezed by the nozzle. If the nozzle is too far from the magnetic plate, the printed model will not stick to the magnetic plate. Please watch the leveling manual or video carefully.
- ✪【HIGH PRECISION PRINT HEAD】: 3D printer's nozzle uses a professional all-metal nozzle to ensure the best printing tem....
Check StockMakerBot SKETCH 3D Printer
- MakerBot SKETCH: Ideal 3D Printer for Home and Education, MakerBot Cloud file management and hundreds of lessons plans, help you maximize student engagement and enable more classroom printing, teacher and student certifications.
- Reliable, Tinker-Free 3D Printer: Classroom and home friendly design with enclosed chambers, built-in particulate filters, and heated, flexible buildplates.
- ISTE-certified, 3D Printer Online Training: Self-paced online courses include 2 MakerBot Certification seats for teachers and 10 seats for students covering printer operation, design-thinking and more.
- Cloud-based, file management: Easy-to-use file management dashboard via MakerBot Cloud allows you to access and manage printing queues between printers from anywhere wirelessly.
- integrates easily with TinkerCad & Fusion 360**.
- 600+ lesson plans: Curated from the largest 3D printing community for educators.
Check Stock
Introduction to Play Analysis
- ✪【Easy installation and simple operation】: For beginners, if you don't know how to use 3D slicing software, you can directly download the model file (Gcode file) to the TF card, insert it into the printer, and start printing. Press the "+" button to put the material in. If you need to replace or remove the material, press the "-" button and wait for a while to pull it out. After the material is put in, press the play button to start printing. The X1 3D printer is also suitable for children, but it needs to be done under the guidance of parents..
- ✪【Important steps】: Leveling is the most important part of using this printer. Press the home button to start leveling, when the nozzle touches the magnetic plate, disconnect the power and start leveling. If the printer is not leveled properly, the magnetic plate may be damaged by being squeezed by the nozzle. If the nozzle is too far from the magnetic plate, the printed model will not stick to the magnetic plate. Please watch the leveling manual or video carefully.
- ✪【HIGH PRECISION PRINT HEAD】: 3D printer's nozzle uses a professional all-metal nozzle to ensure the best printing tem....
Check Stock